Guards control access, while resolvers are responsible for fetching data. Together, they help us protect routes and pre-load essential information. Even though we use them in almost all of our apps, we often don’t fully understand how they actually work. Writing this article helped me realize that I had never truly understood it, and putting this piece together helped me fill those gaps in my own knowledge.
Let’s start with guards
Guards act as checkpoints that determine whether we can access specific routes. They execute certain actions based on whether access is granted or denied.
Generating guards
As always, Angular meets our needs by making guard creation seamless. We can generate a new guard straight from CLI.
[terminal]
ng generate guard GUARD_NAME
Once the command is executed, you’ll be prompted to choose from four available guard types:
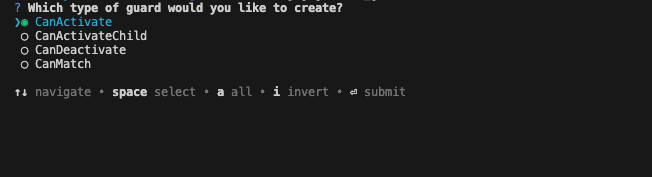
Each of them serves a slightly different purpose. We will go through them one by one. It’s worth noting that you can create these guards manually by simply creating a TypeScript file. To stay consistent, it is standard practice to use the .guard.ts suffix to distinguish their role within our projects.
Guards return types
Every guard shares the same return type values, providing flexibility in how we manage navigation and where we redirect users.
- Boolean – grants or denies access. The situation is slightly different in CanMatch guard; if it returns false, Angular continues searching for other matching routes instead of canceling the navigation.
- UrlTree or Redirect Command – allows for a redirect to a different route instead of simply blocking access.
- Promise or Observable – uses the emitted value to either continue or cancel the navigation.
Guard types
Before we dive into the details of each type, it’s worth noting that guards have access to services provided at the routing level, as well as other data available through the route arguments. Let’s look at an example straight from official docs:
export const routes: Routes = [
 {
   path: 'admin',
   providers: [
     AdminService, // Only loaded with admin routes
     { provide: FEATURE_FLAGS, useValue: { adminMode: true } },
   ],
   loadChildren: () => import('./admin/admin.routes'),
 },
 {
   path: 'shop',
   providers: [
     ShoppingCartService, // Isolated shopping state
     PaymentService,
   ],
   loadChildren: () => import('./shop/shop.routes'),
 },
];
CanActivate
Let’s start with the guard we use most frequently in our projects. CanActivate checks whether users can access a specific route. It is most commonly used to handle redirection during authentication and authorization processes.
- route: ActivatedRouteSnapshot – contains information about the route that is about to be activated.
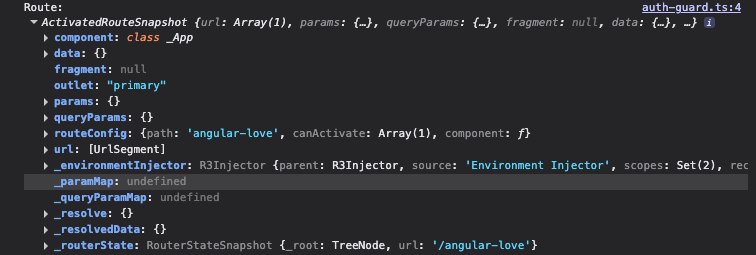
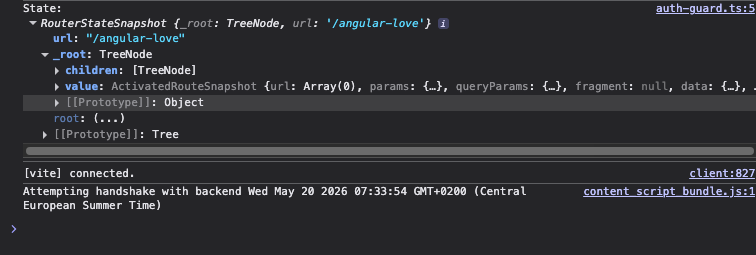
- state: RouterStateSnapshot – contains information about the current state of the router.
For a user to proceed, the guard must return true. If it returns false, the navigation is canceled. However, if the guard returns a UrlTree, the current navigation is aborted, and the router initiates a new navigation based on the returned UrlTree. Here is a short code snippet to help visualize how it works:
export const authGuard: CanActivateFn = (
 route: ActivatedRouteSnapshot,
 state: RouterStateSnapshot,
) => {
 const authService = inject(AuthService);
 return authService.isAuthenticated();
};
CanActivateFn is the function signature used for the canActivate guard in the route configuration.
Example
Before we explore the next few guards I want to show you a few lines of code that I use quite often. This guard protects routes from unauthorized access and prevents users from accessing pages like the login screen once they are already logged in.
import { inject } from '@angular/core';
import { CanActivateFn, Router } from '@angular/router';
import { AuthService } from './auth-service';


export const createAuthGuard = (requiresAuth: boolean, redirectUrl: string): CanActivateFn => {
 return () => {
   const router = inject(Router);
   const authService = inject(AuthService);


   if (authService.isLoggedIn() === requiresAuth) {
     return true;
   }


   return router.createUrlTree([redirectUrl]);
 };
};


export const requireAuth = (redirectUrl = '/login') => createAuthGuard(true, redirectUrl);
export const requireNoAuth = (redirectUrl = '/dashboard') => createAuthGuard(false, redirectUrl);
app.routes.ts
export const routes: Routes = [
 {
   path: 'login',
   canActivate: [requireNoAuth()],
   loadComponent: () => import('./pages/login/login').then((c) => c.Login),
 },
 {
   path: 'dashboard',
   canActivate: [requireAuth()],
   loadComponent: () => import('./pages/dashboard/dashboard').then((c) => c.Dashboard),
 },
 {
   path: '',
   redirectTo: '/login',
   pathMatch: 'full',
 },
];
Simple and clean right? Let’s continue
CanActivateChild
The second guard determines whether the user can access child routes of a specific parent path. This is especially useful when you want to secure an entire section of nested routes at once. The guard is triggered for all children of a given route – even if they are nested across multiple levels.
This guard has access to two arguments:
- childRoute: ActivatedRouteSnapshot – contains information about the “future” state of the activated child route (the one the router is trying to navigate to)
- state: RouteStateSnapshot – contains information about the target state of the router
Just like with CanActivate, this guard can: return either true (navigation continues), false (navigation is canceled) or a UrlTree (triggering a redirect).
Here is a code snippet demonstrating the use of CanActivateChild:
export const adminChildGuard: CanActivateChildFn = (
 childRoute: ActivatedRouteSnapshot,
 state: RouterStateSnapshot,
) => {
 const authService = inject(AuthService);
 return authService.hasRole('admin');
};
CanActivateChildFn is the function signature used for the canActivateChild guard in the route configuration.
CanDeactivate
The CanDeactivate guard stands out from the rest because, unlike the others, it controls whether a user can leave the current route. It is commonly used to prevent data loss – for example when a user tries to navigate away from a page with an unsaved form.
The basic arguments of this guard are:
- component: T – the instance of the component being deactivated
- currentRoute: ActivatedRouteSnapshot – contains information about current route
- currentState: RouterStateSnapshot – contains information about current router state
- nextState: RouterStateSnapshot – contains the target state of the router that the user is navigating to
This guard works similarly to the others and can return true (navigation continues), false (navigation is canceled) or a UrlTree (triggering a redirect). Here is a short code snippet from official docs:
export const unsavedChangesGuard: CanDeactivateFn<Form> = (
 component: Form,
 currentRoute: ActivatedRouteSnapshot,
 currentState: RouterStateSnapshot,
 nextState: RouterStateSnapshot,
) => {
 return component.hasUnsavedChanges()
   ? confirm('You have unsaved changes. Are you sure you want to leave?')
   : true;
};
CanDeactivateFn is the function signature used for the canDeactivate guard in the route configuration.
CanMatch
This is the final guard type which determines whether a specific route should be matched during the routing process. What makes it unique is that if the guard returns false, Angular doesn’t cancel the navigation; instead, it simply skips that route and continues trying to match subsequent route definitions. This makes it a perfect tool for scenarios like : feature flags, A/B testing, conditional route loading.
The guard receives the following arguments:
- route: Route – configuration of the route being evaluated
- segments: UrlSegment[] – url segments, that haven’t been matched yet by previous routing levels
The guard returns the standard types boolean or UrlTree, but when it returns false, Angular attempts to match subsequent routes instead of aborting the navigation.
Simple code examples:
export const featureToggleGuard: CanMatchFn = (route: Route, segments: UrlSegment[]) => {
 const featureService = inject(FeatureService);
 return featureService.isFeatureEnabled('newDashboard');
};
It can also be used to conditionally assign different components to the same path:
const routes: Routes = [
 {
   path: 'dashboard',
   component: AdminDashboard,
   canMatch: [adminGuard],
 },
 {
   path: 'dashboard',
   component: UserDashboard,
   canMatch: [userGuard],
 },
];
CanMatchFn is the function signature used for the canMatch guard in the route configuration.
The CanMatch predecessor: CanLoad (deprecated)
Although CanLoad has been replaced by CanMatch, you may still encounter it in older projects. This guard was used to determine whether a children route could be loaded at all. If all guards return true, navigation continues as expected. If even one guard returns false, navigation is canceled. There is also an option where a guard returns a UrlTree; in that case, the current navigation is aborted, and the router initiates a new one based on the provided tree.
Using guards in routes configuration
Once you’ve created your first guards (yay!), it’s time to configure them within your route definitions. Guards are defined in arrays, allowing you to apply multiple checks to a single route. Angular executes them in order they appear in the array. But what happens when multiple route definitions match the same URL? In such cases, the order in the configuration matters – the router will navigate to the first path that successfully validates all its guards.
const routes: Routes = [
 // Basic CanActivate - requires authentication
 {
   path: 'dashboard',
   component: Dashboard,
   canActivate: [authGuard],
 },
 // Multiple CanActivate guards - requires authentication AND admin role
 {
   path: 'admin',
   component: Admin,
   canActivate: [authGuard, adminGuard],
 },
 // CanActivate + CanDeactivate - protected route with unsaved changes check
 {
   path: 'profile',
   component: Profile,
   canActivate: [authGuard],
   canDeactivate: [canDeactivateGuard],
 },
 // CanActivateChild - protects all child routes
 {
   path: 'users', // /user - NOT protected
   canActivateChild: [authGuard],
   children: [
     // /users/list - PROTECTED
     {path: 'list', component: UserList},
     // /users/detail/:id - PROTECTED
     {path: 'detail/:id', component: UserDetail},
   ],
 },
 // CanMatch - conditionally matches route based on feature flag
 {
   path: 'beta-feature',
   component: BetaFeature,
   canMatch: [featureToggleGuard],
 },
 // Fallback route if beta feature is disabled
 {
   path: 'beta-feature',
   component: ComingSoon,
 },
];
Data resolvers
Resolvers allow us to fetch necessary data before navigating to a selected path. This ensures that our component will receive all required data before they even begin to render on our screen. By using resolvers, we can eliminate “loading states” and prevent UI flickers, which significantly improves UX through effective data pre-loading. However, there is a trade-off: using resolvers may result in a longer delay before the redirection completes. Ultimately, both approaches have their pros and cons. You should carefully weigh these factors and decide which strategy fits your application’s needs.
What are those and why should we use them?
Resolvers are functions (ResolveFn) or classes responsible for fetching data before a route is activated. They are triggered before the target route becomes active, allowing the component to access pre-loaded data through ActivatedRoute. Resolvers have access to services provided at the route level as well as route-specific metadata passed via the route argument. Using resolvers helps address several common challenges:
- eliminating empty states – components don’t have to wait for data after they appear; they have everything they need
- better ux – there are no loading states (spinners/skeletons etc.)
- error handling – data fetching issues can be resolved before the URL even changes, allowing for better control over the user’s navigation flow
- data cohesion – guarantees that data is available before rendering. This is critical for SSR (Server-Side Rendering), where the server must deliver a fully populated page to the client
Creating resolvers
Creating a new resolver is a straightforward process of defining a function with the appropriate ResolveFn type. This function receives both ActivatedRouteSnapshot and RouterStateSnapshot as parameters. Below we can see a few examples straight from the official docs showing how a resolver fetches user information before the route is rendered.
import {inject} from '@angular/core';
import {UserStore, SettingsStore} from './user-store';
import type {ActivatedRouteSnapshot, ResolveFn, RouterStateSnapshot} from '@angular/router';
import type {User, Settings} from './types';
export const userResolver: ResolveFn<User> = (
 route: ActivatedRouteSnapshot,
 state: RouterStateSnapshot,
) => {
 const userStore = inject(UserStore);
 const userId = route.paramMap.get('id')!;
 return userStore.getUser(userId);
};
export const settingsResolver: ResolveFn<Settings> = (
 route: ActivatedRouteSnapshot,
 state: RouterStateSnapshot,
) => {
 const settingsStore = inject(SettingsStore);
 const userId = route.paramMap.get('id')!;
 return settingsStore.getUserSettings(userId);
};
Configuring routes with resolvers
You can add multiple resolvers to your routes as key-values within the Routes configuration. It looks something like this:
import {Routes} from '@angular/router';
export const routes: Routes = [
 {
   path: 'user/:id',
   component: UserDetail,
   resolve: {
     user: userResolver,
     settings: settingsResolver,
   },
 },
];
Resolve is a map of data keys assigned to resolvers. The results of these resolvers will be available via ActivatedRoute.data.
Loading data available in resolvers within component
ActivatedRoute
The first approach to retrieving data in a component is through a data snapshot from ActivatedRoute using signals:
@Component({
 template: `
   <!-- We call user() and settings() as functions because they are Signals -->
   <h1>{{ user().name }}</h1>
   <p>{{ user().email }}</p>
   <div>Theme: {{ settings().theme }}</div>
 `,
})
export class UserDetail {
 // Inject the current route information
 private route = inject(ActivatedRoute);
 /**
  * toSignal converts the route.data Observable into a reactive Signal.
  * This Signal will update whenever the route parameters or data change.
  */
 private data = toSignal(this.route.data, { requireSync: true });
 /**
  * computed() creates a derived Signal.
  * It automatically recalculates whenever 'data' changes.
  * We cast 'as User' because route data is typed as 'any' by default.
  */
 user = computed(() => this.data().user as User);
 /**
  * Derived signal for settings.
  * This keeps the template clean and provides type safety.
  */
 settings = computed(() => this.data().settings as Settings);
}
withComponentInputBinding
Another approach is to configure withComponentInputBinding() within the provideRouter settings. This allows you to receive data directly through component inputs, which is a much cleaner and more elegant alternative to using ActivatedRoute. This mechanism can also bind information from:
- query parameters
- path and matrix parameters
- static route data
- resolvers data
import {bootstrapApplication} from '@angular/platform-browser';
import {provideRouter, withComponentInputBinding} from '@angular/router';
import {routes} from './app.routes';
bootstrapApplication(App, {
 providers: [provideRouter(routes, withComponentInputBinding())],
});
Receiving data via inputs provides better type safety and eliminates the need to manually inject ActivatedRoute, leading to more decoupled and testable components:
import {Component, input} from '@angular/core';
import type {User, Settings} from './types';
@Component({
 template: `
   <h1>{{ user().name }}</h1>
   <p>{{ user().email }}</p>
   <div>Theme: {{ settings().theme }}</div>
 `,
})
export class UserDetail {
 user = input.required<User>();
 settings = input<Settings>();
}
Error handling in resolvers
To maintain a high-quality UX, we must gracefully handle errors within our resolvers. Leaving the default behaviour is rarely ideal, as a failed resolver triggers a NavigationError, which can disrupt the overall user journey on our site. There are three fundamental approaches to handling these situations.
Centralizing error handling – withNavigationErrorHandler
This feature allows us to implement a centralized approach for managing all navigation errors, including those triggered by data resolvers. By keeping the logic in one place, we eliminate code duplication across multiple resolvers. Just take a look at the example from Angular documentation:
import { bootstrapApplication } from '@angular/platform-browser';
import { provideRouter, withNavigationErrorHandler } from '@angular/router';
import { inject } from '@angular/core';
import { Router } from '@angular/router';
import { routes } from './app.routes';
bootstrapApplication(App, {
 providers: [
   provideRouter(
     routes,
     withNavigationErrorHandler((error) => {
       const router = inject(Router);
       if (error?.message) {
         console.error('Navigation error occurred:', error.message);
       }
       router.navigate(['/error']);
     }),
   ),
 ],
});
This configuration enables resolvers to follow the single responsibility principle, allowing them to focus solely on their primary task like for example – fetching data.
export const userResolver: ResolveFn<User> = (route) => {
 const userStore = inject(UserStore);
 const userId = route.paramMap.get('id')!;
 // No need for explicit error handling - let it bubble up
 return userStore.getUser(userId);
};
Handling errors by subscribing to router events
This is the second way to handle resolver errors. By subscribing to the router events and filtering specifically for NavigationError, we can gain more granular control. This approach allows us to implement custom error recovery logic tailored to the application’s needs.
import { Component, inject, signal } from '@angular/core';
import { Router, NavigationError } from '@angular/router';
import { toSignal } from '@angular/core/rxjs-interop';
import { map } from 'rxjs';
@Component({
 selector: 'app-root',
 template: `
   @if (errorMessage()) {
     <div class="error-banner">
       {{ errorMessage() }}
       <button (click)="retryNavigation()">Retry</button>
     </div>
   }
   <router-outlet />
 `,
})
export class App {
 private router = inject(Router);
 private lastFailedUrl = signal('');
 private navigationErrors = toSignal(
   this.router.events.pipe(
     map((event) => {
       if (event instanceof NavigationError) {
         this.lastFailedUrl.set(event.url);
         if (event.error) {
           console.error('Navigation error', event.error);
         }
         return 'Navigation failed. Please try again.';
       }
       return '';
     }),
   ),
   { initialValue: '' },
 );
 errorMessage = this.navigationErrors;
 retryNavigation() {
   if (this.lastFailedUrl()) {
     this.router.navigateByUrl(this.lastFailedUrl());
   }
 }
}
Handling errors directly in resolvers
This approach involves catching errors directly within the resolver/function utilizing ResolveFn. Just take a look at the modified version of the example we used earlier.
import { inject } from '@angular/core';
import { ResolveFn, RedirectCommand, Router } from '@angular/router';
import { catchError, of } from 'rxjs';
import { UserStore } from './user-store';
import type { User } from './types';


export const userResolver: ResolveFn<User | RedirectCommand> = (route) => {
 // Inject dependencies using the functional inject() API
 const userStore = inject(UserStore);
 const router = inject(Router);
 // Extract the 'id' parameter from the route URL (e.g., /users/:id)
 const userId = route.paramMap.get('id')!;
 // Fetch user data from the store and handle potential errors
 return userStore.getUser(userId).pipe(
   catchError((error) => {
     // Log the error for debugging purposes
     console.error('Failed to load user:', error);
     /**
      * If fetching fails (e.g., 404), return a RedirectCommand.
      * This stops the current navigation and redirects the user to the list page.
      */
     return of(new RedirectCommand(router.parseUrl('/users')));
   }),
 );
};
Additional informations about resolvers
Loading state
While resolvers prevent loading states from appearing within the components themselves, they do not stop the navigation from being “blocked” while data is being fetched. This can lead to a perceived delay between a user clicking a link and the actual view change. To improve UX during resolver execution, you can listen to router events and display a global loading indicator:
import { Component, inject } from '@angular/core';
import { Router } from '@angular/router';
@Component({
 selector: 'app-root',
 template: `
   @if (isNavigating()) {
     <div class="loading-bar">Loading...</div>
   }
   <router-outlet />
 `,
})
export class App {
 private router = inject(Router);
 isNavigating = computed(() => !!this.router.currentNavigation()); //new approach that replaced NavigationStart/End
}
Accessing parent data in child resolvers
Resolvers are executed in a parent-to-child order. When a parent route with a defined resolver successfully fetches data, that data becomes available to child resolvers that are triggered later in the sequence.
import { inject } from '@angular/core';
import { provideRouter, ActivatedRouteSnapshot } from '@angular/router';
import { userResolver } from './resolvers';
import { UserPosts } from './pages';
import { PostService } from './services';
import type { User } from './types';
provideRouter([
 {
   path: 'users/:id',
   resolve: { user: userResolver }, // user resolver in the parent route
   children: [
     {
       path: 'posts',
       component: UserPosts,
       // route.data.user is available here while this resolver runs
       resolve: {
         posts: (route: ActivatedRouteSnapshot) => {
           const postService = inject(PostService);
           const user = route.parent?.data['user'] as User; // parent data
           const userId = user.id;
           return postService.getPostByUser(userId);
         },
       },
     },
   ],
 },
]);
Summary
The topics we’ve covered today are essential for building secure and user-friendly applications. Whether you are just starting your journey or you’re already a seasoned Angular developer, the solutions presented here are used in the vast majority of real-world applications. A deep understanding of these concepts is key to writing secure, functional, and highly performant software.