I bet you’ve already heard/read about state management. If not, I bet again that you want your applications to be easier to maintain/extend. Of course, having state management in place doesn’t automagically make the application extensible, but it guides us to have a Separation of Concerns to achieve that. In this article, I’ll explain what State Management is and how to use it in your Angular applications using NGXS.
What is a state?
Before we dive deeper and start coding, let’s first see the basics and understand what a “state” is.
Let’s assume that we have a Toggle component where the user can toggle on or toggle off. This component has two states. The state “On” and the state ”Off”. Having said that, the state is a representation of a given time.

As users, we already are benefitted from the state in different areas. Some examples are:
- Navigation
The navigation state tells at a given time on which page we are in the application
- Components
Speaking of a Toggle component, the state could be On or Off
- Application
This is a category that you will see in many blog posts. To make things easier, I would describe the Application state as the Global state of the application. But wait, what do we mean here by saying Global state? Well, Global state is the applications or users' tokens, server data, etc.
You might be wondering what the state looks like.
If we think of a component state, this information is kept in the component class itself
import { Component } from '@angular/core';

@Component({
  selector: 'toggle',
  template: `The HTML code is not important for this article`,
})
export class ToggleComponent  {
  isToggled = false

  toggle() {
    this.isToggled = !this.isToggled;
  }
}
In the code above the isToggled is responsible to keep the toggle state.
And how about the global state? This is no more like an object notation.
{
  user: {
     id: 1234,
     token: 'jwt.token.value'
  },
  todoItems: [
     {
        id: 1,
        name: 'is this yet another todo?',
        isDone: true
     }
  ]
}
In the object above we see two nested objects. The user and the todoItems. This information is Globally accessible from the application. Please note here that these nested objects are also called state slices.
Why State Management?
So far the state seems to be very easy to manage, right? All we have is an object with some slices (nested objects) that we can access directly. Why after all we need to spend more time learning how to use a state management library?
Think the following; Chances are that you might want to add items in the TodoItems array from one component and see a reaction on another component. You might think that this is not hard either. I agree! This could be just some BehaviourSubjects/Observables that keep all the information. We might also need to make sure that when we remove the items, the subscribers on that Observables are getting notified. Make sure that you are covering all the cases when you remove the items. Perhaps you might need to have a map function that gathers all the isDone=true items and all the isDone=false items. How about if we want to use these arrays from multiple places? Are we gonna run this map function n* times? This wouldn’t be that harmful since this is just a map function and is relatively fast. If we however have more advanced and time-consuming operations we would need to have a memoization pattern.
The above are some cases that we need to take into consideration for the global state. We also need to repeat all these cases, again and again, to apply them to each state slice (nested object). If we continue developing and extending this code, congrats, we have managed to build our own state management library ?
Developing a state management library, is like re-inventing the wheel, right? So, let’s have a look at the NGXS.
NGXS Core Concepts
The NGXS embraces the CQRS pattern, similar to what NgRX and Redux are doing. In most cases, the CQRS combines the Event Sourcing pattern where, in a nutshell, uses events that dictate the data state. Some event examples could be AddTodoItem or RemoveTodoItem. So, when we perform an Action, an event is dispatched and that event mutates the State in the Store. The state mutation is achieved via a function; you can think of that function as an event handler.
To illustrate this, let’s see a quick example.
Let’s say that we have the following default State in the Store.
{
  todoItems: []
}
If we want to add an item in the state, we should dispatch the event AddTodoItem, and also have an event handler who is taking care of that event. So, if we dispatch the Event AddTodoItem({id: 1, name: 'a todo item', isDone: false}), the state will become
{
  todoItems: [
     {
        id: 1,
        name: 'a todo item',
        isDone: false
     }
  ]
}
And of course, we need to have a way to read data from the store. Something like:
const doneItems = todoItems.filter(todoItem => todoItem.isDone)Let’s now see how the above is translated using NGXS terms.
- Actions
You can think of the Actions as Events. In the todo example above the actions could be the AddTodoItem, RemoveTodoItem, MarkTodoAsRead, MarkTodoAsUnread. As you can see, the Actions describe the application’s interoperability.
- Store
The Store is the container where the State(s) live. In the example above we mentioned the state slices. An application can have multiple states, and these states live in the store. It also provides a way to read data from the states, mutate the states, etc. Well, the Store is the heart of the State Management library.
- State
The State is a container that represents the schema of the particular state slice, it also handles the actions of that state. While the Store is the heart of the State Management Library, the state is the heart of the particular state slice. - Queries/Selectors
The queries is the mechanism where we are getting the data out of the state. Please note that the Read and Write operations are different in NGXS, which is aligned with the CQRS pattern.
The image below defines a flow using the NGXS semantics.
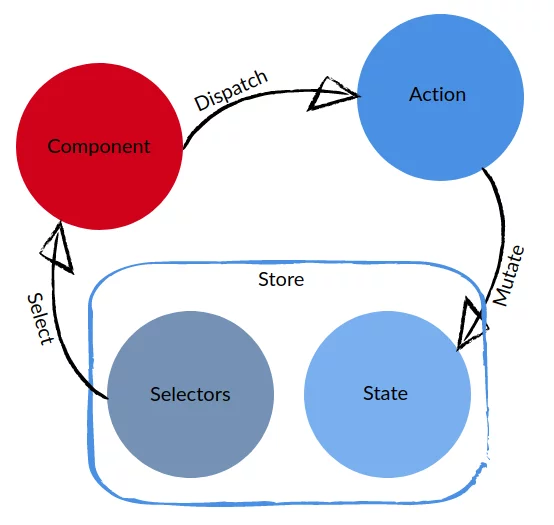
- A component Dispatches an Action
- The Action mutates the State in Store
- A component Selects data from the Store using the Selectors
NGXS Example
Yeah!! Coding time!
We will create yet another TODO application that looks like the video below.
1) Installation
npm install @ngxs/store --save2) Register the NGXS module in the app.module.ts
import { NgModule } from "@angular/core";
import { NgxsModule } from "@ngxs/store";
import { AppComponent } from "./app.component";

@NgModule({
  declarations: [AppComponent],
  imports: [NgxsModule.forRoot([])],
  bootstrap: [AppComponent],
})
export class AppModule {}
The imports array above has the NgxsModule.forRoot([]) where we have to add the state that we will create.
3) Create the State and define the model
Let’s create the model of each TODO item. By seeing the video we can tell that we need to have a Title, a Status (if it is active or not), and perhaps an id as our unique identifier.
export interface TodoModel {
  id: number;
  title: string;
  isActive: boolean;
}
This is the model of each item, but we also need to have a type for the state itself.
export interface TodoStateModel {
  items: TodoModel[];
}
This means that all my TODO items will be stored in the items property of that state.
So far we have just wired up the module and created the models. Let’s see now how to create the state.
import { Injectable } from "@angular/core";
import { State } from "@ngxs/store";
import { TodoStateModel } from "./todo-state.model";

@State<TodoStateModel>({
  name: "todo",
  defaults: {
    items: [],
  },
})
@Injectable()
export class TodoState {}
The state is just a class but notice that we use the @State decorator where we define the name of the State and the defaults.
- The name is useful to differentiate one state slice from the other.
- The defaults are useful to define the default state upon application initialization.
4) Create the actions
By observing the video with the TODO application (above) we see that we need actions to create a TODO item and to update the status of the TODO item (true/false).
import { TodoModel } from "./todo-state.model";

export class AddTodo {
  static readonly type = "[Todo] Add todo";
  constructor(public title: string) {}
}

export class ChangeStatus {
  static readonly type = "[Todo] Change status";
  constructor(public readonly todoItem: TodoModel, public readonly status: boolean) {}
}
Each action is a class where we define the type as the unique identifier and the constructor where we declare the arguments. Remember that we said that the action can be thought like an event? Since the events have event arguments, we use the constructor to express them.
5) Dispatch the actions
<form autocomplete="off" (ngSubmit)="add()">
  <mat-form-field appearance="fill">
    <mat-label>Enter your TODO item</mat-label>
    <input name="title" matInput [(ngModel)]="newTitle" />
  </mat-form-field>
</form>
import { Component } from "@angular/core";
import { Store } from "@ngxs/store";
import { AddTodo } from "./store/todo.actions";
@Component({
selector: "app-root",
templateUrl: "./app.component.html",
styleUrls: ["./app.component.scss"],
})
export class AppComponent {
newTitle: string;
constructor(private store: Store) {}
add() {
this.store.dispatch(new AddTodo(this.newTitle));
this.newTitle = "";
}
}When we submit the form we are invoking the add() method where we use the store to dispatch an action. The component here is responsible to dispatch an action with some arguments, and it’s not responsible to mutate the state of the TODO items (Single Responsibility Principle). We expect the TODO items to become length + 1, but this should happen in the todo.state.ts.
6) Handle the actions
import { Injectable } from "@angular/core";
import { Action, State, StateContext } from "@ngxs/store";
import { TodoModel, TodoStateModel } from "./todo-state.model";
import { AddTodo } from "./todo.actions";

@State<TodoStateModel>({
  name: "todo",
  defaults: {
    items: [],
  },
})
@Injectable()
export class TodoState {
  @Action(AddTodo)
  addTodo(ctx: StateContext<TodoStateModel>, action: AddTodo) {
    const state = ctx.getState();

    const newItem: TodoModel = {
      id: Math.floor(Math.random() * 1000),
      title: action.title,
      isActive: true,
    };

    ctx.setState({
      ...state,
      items: [...state.items, newItem],
    });
  }
}
We created the method addTodo and we have also decorated that method with the @Action decorator. This is how we link an action with a method. In nutshell, this method will be invoked by the store when the AddTodo action is dispatched. The store will call the method by providing two arguments.
- state context (ctx), where we can get the state, change the state, and many more.
- The action where it has the event arguments. We can also describe the action as the payload
Please note, when we handle an action, in most cases, we keep the state as is and we are changing only what that action is meant to do. That’s why we use the spread operators.
ctx.setState({
      ...state,
      items: [...state.items, newItem],
    });
We have already done great progress and at this point, we expect to have some items into our state. Let’s select those items using the selectors!
7) Create the selectors
According to the animated gif above, the requirements are to display the items in a list, display the number of the done items, and also display the items of the active items. For this reason, we will create three selectors.
import { Selector } from "@ngxs/store";
import { TodoStateModel } from "./todo-state.model";
import { TodoState } from "./todo.state";

export class TodoSelectors {
  @Selector([TodoState])
  static items(state: TodoStateModel) {
    return state.items;
  }

  @Selector([TodoState])
  static doneItems(state: TodoStateModel) {
    return state.items.filter((it) => !it.isActive);
  }

  @Selector([TodoState])
  static activeItems(state: TodoStateModel) {
    return state.items.filter((it) => it.isActive);
  }
}
We have three static methods where each one is decorated with the @Selector decorator. When the Store invokes a selector method, provides as arguments the model of the state we have defined in the array.
In the items selector we are just returning the state.items.
In the other two selectors, we are returning the state.items where the isActive is either true or false.
Furthermore, the returned object is a slice of the state and we can not mutate the state using that object. Since NGXS embraces the CQRS pattern, the read and write are different operations and as such we use the selectors to only retrieve the data from the state.
Please note that the selectors in NGXS have the option to use the memoization pattern.
8) Use the selectors in the component
import { Component } from "@angular/core";
import { Select, Store } from "@ngxs/store";
import { Observable } from "rxjs";
import { TodoModel } from "./store/todo-state.model";
import { AddTodo } from "./store/todo.actions";
import { TodoSelectors } from "./store/todo.selectors";

@Component({
  selector: "app-root",
  templateUrl: "./app.component.html",
  styleUrls: ["./app.component.scss"],
})
export class AppComponent {
  @Select(TodoSelectors.items)
  items$: Observable<TodoModel[]>;

  @Select(TodoSelectors.activeItems)
  activeItems$: Observable<TodoModel[]>;

  @Select(TodoSelectors.doneItems)
  doneItems$: Observable<TodoModel[]>;

  newTitle: string;

  constructor(private store: Store) {}

  add() {
    this.store.dispatch(new AddTodo(this.newTitle));
    this.newTitle = "";
  }
}
Since we have three selectors, we also need three class properties. Each of them is decorated using the @Select decorator providing the static method of the selector.
The activeItems$ and doneItems$ seem not to have a complete flow since we didn’t yet mark the items as done. In the article below you will find the link to the code. Before checking the code give it a try and then compare your solution with the link.
NGXS and Lazy Modules
Early in the article we talked about the state slices. As a reminder, we said that a state is an object where each nested object is a state slice. So far we created the todo slice which has all the TODOs in the items property
{
 todo: {
   items: []
  }
}
How about if we need to create more slices and, furthermore, how about if I need to use a state slice in a lazily loaded module?
The logic and the code are exactly the same, with the only difference being the way we are registering the state module
@NgModule({
  imports: [NgxsModule.forFeature([LazyState])]
})
export class LazyModule {}
Note that instead of using NgxsModule.forRoot() we use the method .forFeature()
Conclusion
First and foremost, I am really glad you read my article. I didn’t expect to have it that lengthy, but I hope you learned how easy it is to use the NGXS and also how important is to have a state management library in your application.
There are many more that we can do with the NGXS and I am highly encouraging you to check the official documentation https://www.ngxs.io/