It is finally time to present the process of integrating an existing application with Service Workers. In this article we will present three different available approaches when it comes to turning a project into a PWA.
For the purposes of this article, we have created a simple application to display graphics taken from an API exposed by our server. The graphics returned by the API change every 5 seconds.
Our SW will pursue a stale-while-revalidate strategy, which means that the displayed graphics will be downloaded from the cache, while synchronization will be performed in the background.
When a new graphic is available at the application launch, a SnackBar should be displayed informing the user that an update is available. When the user is willing to download the new data, the application will reload.
The overall picture is as follows:
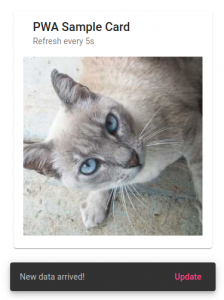
A pictorial application.
As for the application itself, the finished source code is available in our repository. We encourage you to download and experiment, and refer to README.md for more information.
- Angular PWA
1.1. Angular.json
1.2. App.module
1.3. index.html
1.4. Icons
1.5. Service Worker Service
1.6. Repository Service - Server
- Recipes
3.1. Service Worker - Angular Service Worker
- WorkBox
- Recipes vs Angular Service Worker vs WorkBox
6.1. Recipes
6.2. Angular Service Worker
6.3. WorkBox - Summary
- Useful links
Angular PWA
To convert our application into a PWA we need to add the @angular/pwa package. To do so, we execute the command:

Note that it is important not to use the Nx CLI for this purpose.
The command above will generate a Service Worker to cache our application resources. For a detailed process please refer to Angular documentation.
After adding the mentioned package, our application has been additionally patched in several places.
Angular.json
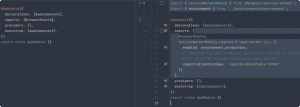
Changes have been made to the configuration file, causing the building and copying of the predefined Angular Service Worker simultaneously with our application.

Angular.json changes.
As you can see in the comparison above, a manifest was attached to our application’s resources, the serviceWorker flag was enabled and the path to the ngswConfigPath was set, containing the configuration for the building of the Service Worker.
This Web App Manifest contains basic information about our application and is responsible for its presentation after the installation by the user. For more information, please refer to the MDN documentation or to the web.dev article, which briefly discusses most of the available options.
App.module
Our application module is additionally enriched with ServiceWorkerModule, which is responsible for registering the Service Worker itself.
Changes in app.module.ts.
Index.html
The aforementioned Web App Manifest still needs to be included in our index.html, then, when opening a page with our application, the browser will recognize it as PWA. Furthermore, the theme-color is set by default, which is responsible for the color of the browser’s banner during visits.
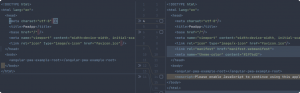
Changes in index.html.
Icons
Besides the changes mentioned above, cons are added to the application, which will be used in PWA ( applications icon itself, icon on SplashScreen).
Unfortunately ng serve doesn’t support PWA, which is why, in order to test the correctness of the applications integration, we have to use a separate HTTP server. We can use http-server for this purpose (more details can be found in documentation).
An additional limitation is the necessity to install the @angular/pwa package only within the module of the application itself (it is necessary to import ServiceWorkerModule in app.module), it cannot be installed within another module or library.
Service Worker Service
To ensure communication between SW and our application, we have to listen for the message read event by defining the ServiceWorkerContainer.onmessage property. A ServiceWorkerService is defined for this purpose, providing a method to start listening.
Repository Service
In order to separate the logic for retrieving remote resources, a separate RepositoryService was created. At the moment it contains a single method that retrieves graphics from our server, which we will create in the next chapter.
Server
As part of our integration, we also need to create a server that exposes an API to download graphics that change every 5 seconds.
To do this, we need to have the @nrwl/nest plugin installed, which we will use to generate the NestJS server application when we run the commands:

and

The implementation comes down to issuing an endpoint, which returns one of the available images after questioning. The code of the service responsible for setting the graphic is reduced to the following method:
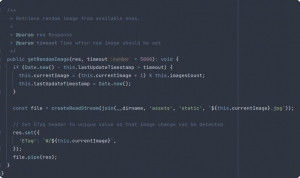
The method responsible for changing the served graphics.
The key point is to set the ETag in the response header to a unique value matching the current graphic, based on which our application will detect the graphic change.
The additional step we need to do is to allow access to the header, mentioned above, on the client side. Changes should be made in the main.ts file.
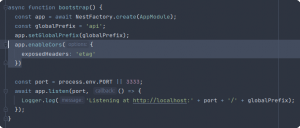
Server configuration giving client-side access to the selected header.
Recipes
Based on the configuration we made in the previous chapters, we can finally get down to implementing the Service Worker.
In the beginning, we will start without using any ready-made libraries, just with Service Worker API. In order to implement the stale-while-revalidate strategy, we can use a ready – made recipe.
Service Worker
The implementation comes down to a few key points and methods. During SW installation, persistent files are cached. In the case of our application, this comes down to the index.html file, the application icon and the manifest.
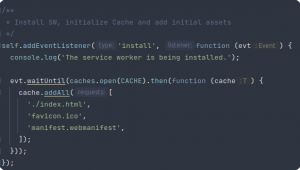
PreCaching of application resources.
The most important logic, on the other hand, is in the method called on the fetch event, which is invoked every time any resource is fetched.
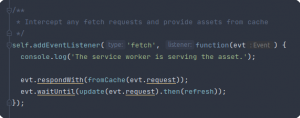
Method called when an application resource is requested.
As you can see above, when an application sends a request for a resource, it is read from the memory cache. In the meantime, it is downloaded, saved in the cache and a message is sent to the application about the availability of new data.
It should be noted here, that this mechanism is used only when the SW is activated. Activation occurs depending on the registrationStrategy set during SW registration.
In the case of registerImmediately, SW is registered immediately and, by using Clients.claim(), we can take control of the page right away, writing data from the first requests to the cache.
However, when we don’t have the ability to capture the first requests, SW activation will occur after the application reloads, only then the requests will be cached.
To alleviate the problem above, we may try to cache more files during installation, but this won’t solve the issue with graphics provided by our server. Here, we can use a fallback mechanism, displaying a placeholder instead of the current graphics. The final solution depends on the nature of the application and the required preferences.
The last thing is to remove the Angular Service Worker properties from the angular.json file, without copying the unused NGSW and to minimize the final application size.
Changes to angular.json saying we don’t want to use NGSW.
Angular Service Worker
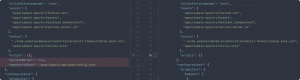
In our application, using the predefined Angular Service Worker, comes down to the appropriate configuration in the ngsw-config.json file.
The most important point is setting the dataGroups defining the mechanism of caching resources downloaded from specific addresses. In the case of our application, we are most interested in caching graphics downloaded from the server using the stale-while-revalidate strategy, and this can be achieved by setting the appropriate values for the strategy and timeout fields.
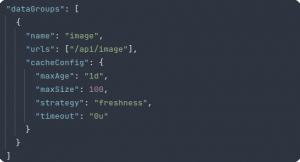
Caching images using a constant-while-revalidate strategy.
At this point, all that remains is to implement the communication about available new data from SW to our application.
We do this by creating a new Service Worker which listens for the fetch event and sends a message to the client in case it concerns data we are interested in. In order not to lose the functionality of NGSW, we need to use WorkerGlobalScope.importScripts() which was mentioned in the previous article, in the chapter „Multiple Service Workers”.
Leaving the refresh() method aside, the whole thing looks like this:
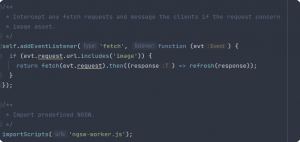
Angular Service Worker extension.
WorkBox
In the case of Service Worker definition using WorkBox modules, our implementation comes down to using one of the methods provided by the workbox-recipes package.
Using a similar solution to the Angular Service Worker, we extend our implementation to send a message to the client about an available new graphic.
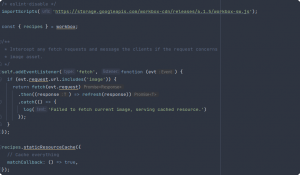
SW Implementation with WorkBox library.
It should also be noted that when parsing our SW, the workbox-sw library is downloaded from CDN, providing a global workbox object from which we extract the modules of interest. The modules we use are automatically cached.
Additionally, analogous to the implementation using Recipe, we remove the Angular Service Worker properties from the angular.json file.
Recipes vs Angular Service Worker vs WorkBox
After transforming our application into a PWA and integrating it with various types of Service Workers, we more or less have an idea of how to do it and what the differences between the presented approaches are. Let’s try to summarise the knowledge and information gathered in a few words.
Recipes
The crude implementation of Service Worker using the Service Worker API contains a relatively large amount of boilerplate code compared to the others. Cache versioning is also problematic (you have to manually rename it as the version changes), and implementation of some of the functionality becomes prohibitively complex.
However, it is a great place to start your SW adventure, as it is the only way to fully understand what is going on „below the surface”. Moreover, we have full control over SW behaviour so we can implement our own custom solutions.
However, it should be taken into account that they will not necessarily be safe and in this case, the security of the application is entirely in the programmer’s hands. Additionally, the entry threshold is relatively high compared to alternative solutions.
Angular Service Worker
When it comes to Angular Service Worker, it works great for Angular applications that only want to use basic PWA functionality such as caching and Push Notifications. The installation process is simple and implementation usually comes down to filling in a few properties in the configuration file.
The trouble starts when we want to introduce some of our own logic, then we have to extend the basic implementation.
Also, the way in which certain functionalities are solved in Angular Service Worker will not necessarily suit our needs, under those circumstances, even extending may not be enough. In this case we can use WorkBox.
WorkBox
We get rid of a significant part of the boilerplate code using WorkBox. In addition, we have great control over the behaviour of Service Worker, we can freely configure individual modules with each other, implementing various types of strategies, and even define our own strategies or plug-ins.
If the requirements of our application include non-standard functionality, this is definitely the best option. In addition, Google’s engineers provided excellent documentation with actual usage examples.
Summary
Using a PWA will certainly improve the User Experience of our application. There are several methods available for converting it into a PWA, and we have presented the main ones in our article.
Each of the discussed approaches has its pros and cons and which one we finally choose depends largely on the requirements of the application.
Gathering the discussed knowledge, we present a brief graphical summary of the discussed approaches in selected categories.

A comprehensive comparison of selected aspects of implementing Service Workers in different ways.
We hope that the article has shed some light on this ever-evolving and vast world of Progressive Web Apps and that you have also picked up something new and valuable from our article.
Useful links
- https://developers.google.com/web/tools/workbox/modules
- https://angular.io/guide/service-worker-getting-started
- https://serviceworke.rs/
- https://pwa-fundamentals.nl/chapters/service-workers.html
- https://developer.mozilla.org/en-US/docs/Web/API/Service_Worker_API/Using_Service_Workers
- https://web.dev/two-way-communication-guide/
- https://jakearchibald.com/2014/offline-cookbook
- https://stackoverflow.com/questions/45257602/sharing-fetch-handler-logic-defined-across-multiple-service-workers
- https://developers.google.com/web/fundamentals/primers/service-workers
- https://developer.mozilla.org/en-US/docs/Web/API/Service_Worker_API
- https://wicg.github.io/background-sync/spec/
- https://whatwebcando.today/